How to clean your vape coil
We get it – it’s easy to get lost in vaping lingo, especially if you’re only just a beginner. Many people making the switch from cigarettes to vaping assume the height of vape care is charging your device and filling it up with e-liquid when needed – this couldn’t be further from the truth.
Vapes are simple to use and require little setup, however just like most pieces of technology they need a little bit of maintenance to give you their best for years to come. The good news is that upkeep is neither time-consuming nor difficult – normally it involves cleaning out your vape thoroughly to make sure it’s at its best performance. The main two components that normally require cleaning are the tank, and the vape coil.
Vape coil, what does it do?
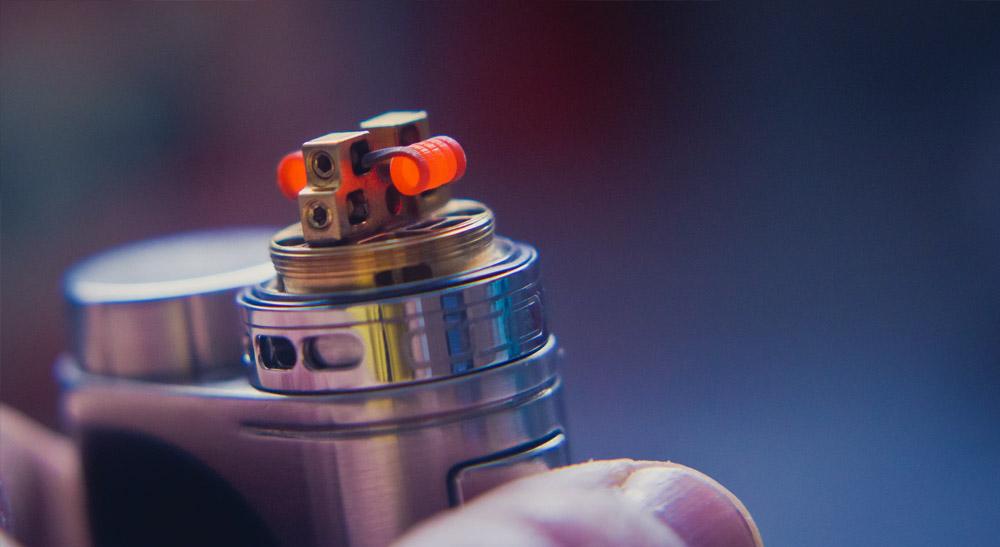
Vape coil, also commonly referred to as just coil, atomizer or atomizer head, is a thin wire, wrapped into a coil, often made out of Nichrome or Kanthal. The coil is essentially responsible for creating the vapour, by heating up the e-liquid to your desired temperature. The coil has wicking material running through it, usually made out of cotton or silica rope, which absorbs the e-liquid.
How often do you clean your vape coil?
How often you should clean your coil depends on the type of device you’ve got, and how often you use it. What e-liquids you tend to go for can also have an impact on the longevity of your vape coil, with some vapers claiming that e-liquids containing sweeteners like sucralose can shorten the lifespan of your coils, as the sweetener caramelizes when heated at higher temperatures and can create a lasting residue on the coil.
The general rule is to depend on your own sense of taste to find out whether your vaporizer needs cleaned. A coil with e-lqiuid build-up will cause the vapour to taste somewhat burnt, and can also cause “flavour ghosting”, which is when you can still taste traces of the old e-liquid flavour you had in the tank prior to refilling it. As you develop your own vaping style knowing when to change the coil will come to you intuitively, but generally, you should clean your coil a minimum of once a month.
Some good indicators of when you should clean your coil:
- Burnt taste
- Trouble producing vapour
- “Flavour ghosting”
- Visual residue on top of the coil
- Loud gurgling noises coming from the tank
Should I clean or replace my vape coil ?
Even a coil that’s cleaned regularly will need replacing after a while. If your device stops producing vapour completely, this might mean the coil could have snapped or is beyond use – meaning a replacement will be needed. Otherwise, when to replace your vape coil is dependent on your requirements and vaping style. Some vapers might replace their coil even a couple of times a month – however, this is not essential for the average user. If you keep your coil clean you should only ever need to replace it once every month or two, with occasional users needing to replace their coils only every couple of months.
How to clean your vape coil?
And now, to the most important part. You now know when to clean your coil – but the big question is now, how do you do it? Cleaning your coil is nowhere near as intimidating as it sounds, and you will be able to do it easily and quickly at home with close to no equipment.
There are plenty of tutorials online that show you how to clean your coil at home – many of them suggest soaking your coil in vinegar, ethanol, or even vodka to get rid of the residue. As much as alcohol might be successful at removing built-up gunk around the coil, there’s nothing that a little hot water can’t do, so reaching out for your liquor cabinet may not be necessary. Follow the steps below to easily and safely clean the coil in your device:
1. Disassemble your device. Keep all batteries and electronic parts away from water and do not get them wet. Take the tank off the vape, remove the mouthpiece and discard any leftover e-liquid in the tank. Remember to keep all the pieces safe to avoid losing them. If you’re not sure how to disassemble your device look up the model of your vape on youtube or find instructions on the manufacturer’s website.
2. Run hot water through the tank. If the build-up is particularly stubborn, you can soak the tank in hot water for an hour to help soften up the residue.
3. Take a paper towel and run it through the tank, making sure all residual water is wiped off. You may want to use a cotton q-tip if you need to get into smaller areas.
4. Air dry. Leave the tank on a piece of paper towel or microfibre cloth to make sure all water has dried off for an hour. Make sure to let the tank dry naturally, without applying heat or direct sunlight to it as this may cause damage to some components.
And there you have it! It truly is that simple. If you clean your coil but find that it has made little improvement to your device, it is most likely time for you to replace it. We have a fantastic range of coils available which you can view here if you’re ready for a change!
Now that you’re sorted for coils – check out our guide on “How to pick the best e-liquid“ to find the perfect e-liquid flavours for you!